Sniffing a HTTP session
Introduction
This article is also available in Serbo-Croatian and Slovak.
This article explains how to obtain a HTTP trace. That is, to obtain the text that is send to the server and back when requesting a webpage. These tools are discussed:
| Name | Method | Language | Features | Platform |
|---|---|---|---|---|
| Wireshark | packet capture | C | medium | cross platform |
| Fiddler | WinInet / HTTP proxy | .NET | extensive | Windows |
| Httpdbg | HTTP proxy | C | simple | Unix |
| Burp Proxy | HTTP proxy | Java | extensive | cross platform |
| TCPWatch | port forward / HTTP proxy | Python | simple | cross platform |
An example dump:
GET / HTTP/1.1
Host: localhost
User-Agent: Mozilla/5.0 (X11; U; Linux i686; en-US; rv:1.9.1.7) Gecko/20100106 Ubuntu/9.10 (karmic) Firefox/3.5.7
Accept: text/html,application/xhtml+xml,application/xml;q=0.9,*/*;q=0.8
Accept-Language: en-us,en;q=0.5
Accept-Encoding: gzip,deflate
Accept-Charset: ISO-8859-1,utf-8;q=0.7,*;q=0.7
Keep-Alive: 300
Connection: keep-alive
If-Modified-Since: Thu, 21 Jan 2010 21:54:15 GMT
If-None-Match: "1f7804a-2c-47db3be780fc0"
Cache-Control: max-age=0

HTTP/1.1 304 Not Modified
Date: Mon, 15 Feb 2010 15:33:05 GMT
Server: Apache/2
Connection: Keep-Alive
Keep-Alive: timeout=1, max=100
ETag: "1f7804a-2c-47db3be780fc0"
Vary: Accept-Encoding,User-Agent
More tools:
Wireshark is a network sniffer which can show and save HTTP transactions. Because it works on packet level rather than on HTTP level, the client does not need to be configured in order to capture the request.
- Start Wireshark. You may have to start it as root so that you have enough permissions to sniff some packets.
-
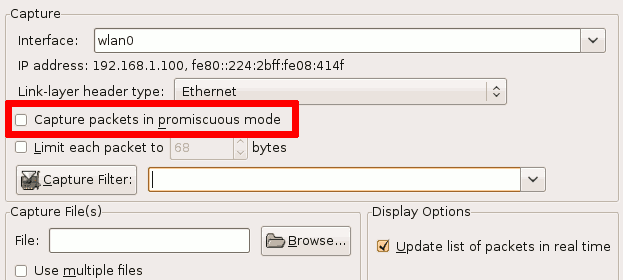
If the computer on which you are sniffing is the same computer that initiates the HTTP transaction, disable promiscuous mode on the interface. This means that it does not listen to all packets, but just the packets meant for this network interface.
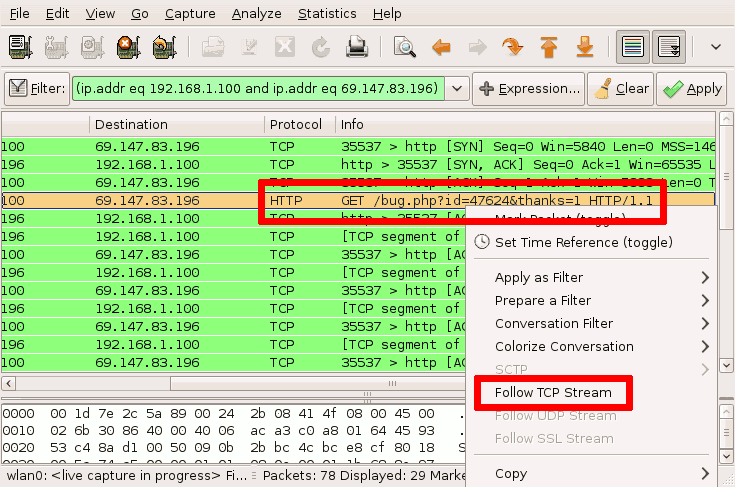
- You may want to enter a filter like tcp.port == 80 in the filter bar.
- Do your request.
- Find a packet with the request in it. It will usually start with GET or POST.
-
Right click and select "Follow TCP stream".
-
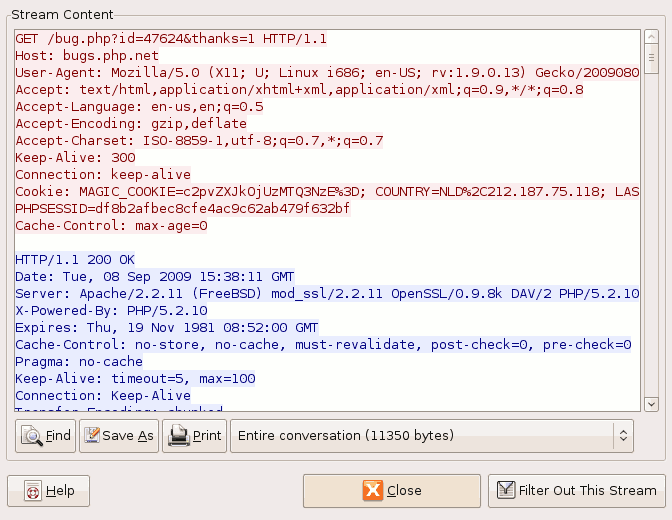
A window appears with the HTTP conversation. You can save it using the Save As button.
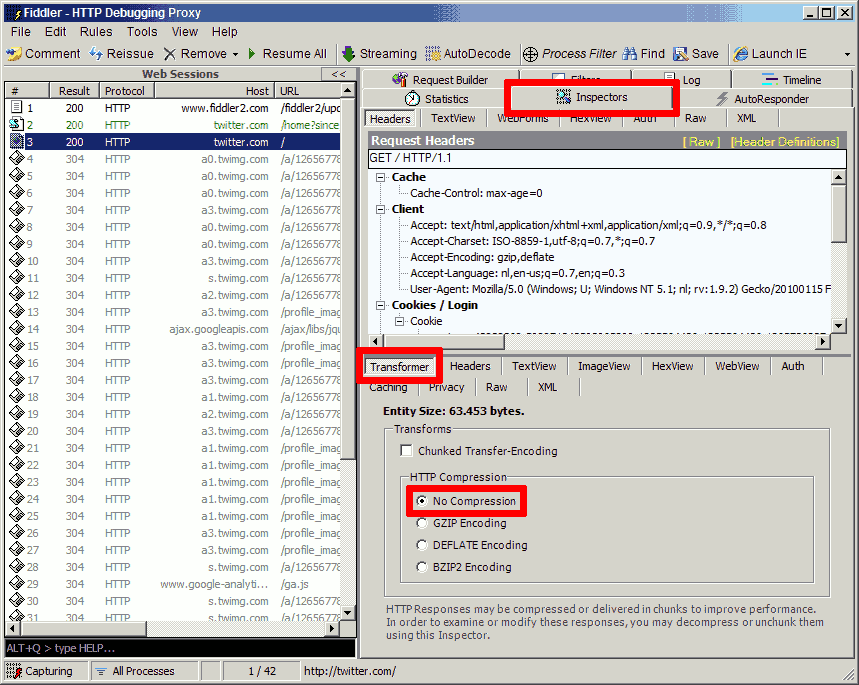
Fiddler is a HTTP proxy for MS Windows which can show and alter HTTP transactions.
- Start Fiddler.
- If your HTTP client is not using WinInet, configure a proxy server so that traffic is routed through Fiddler. Use as proxy localhost, port 8888.
- Do your request.
- Click on the corresponding HTTP call in Fiddler.
- If the request is compressed or encoded, decode it using the "Transformer" tab.
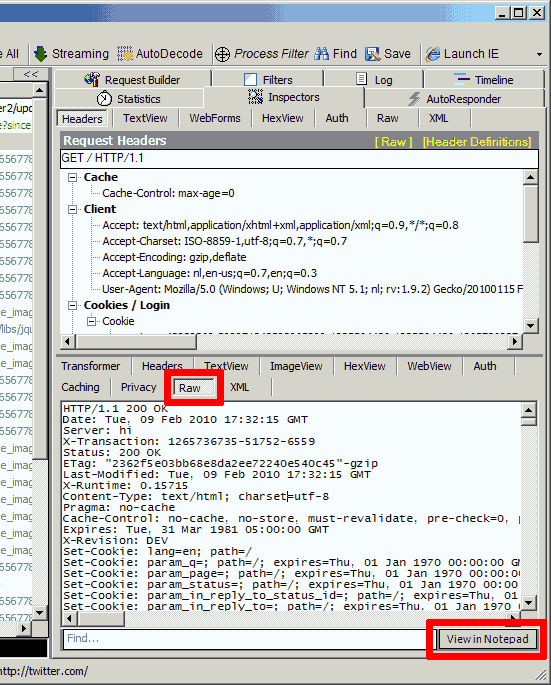
- The response can be viewed at the bottom of the tab. It can be opened in notepad and subsequently saved.
Httpdbg is a command line HTTP proxy which dumps all requests and responses to stdout and to a log file.
- Start httpdbg, with a port number as argument. By default, httpdbg only saves headers. Use the -t option to show text.
- Configure the client to use httpdbg as proxy. Host localhost, the same port passed as argument to httpdbg.
- Do the request.
- The request and response is written to httpdbg.log.
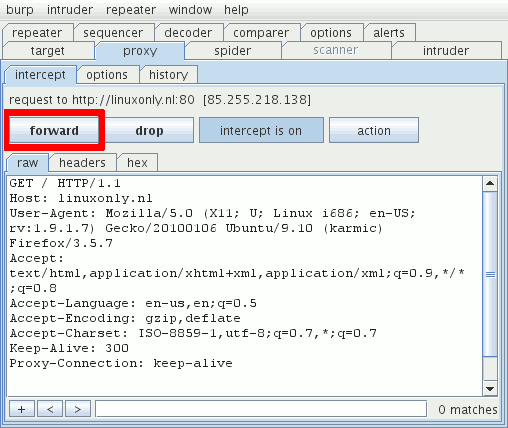
$ ./httpdbg -t 8080
./httpdbg version 0.8 started at port 8080 (http://www.reitshamer.com/source/)
GET http://twitter.com/ HTTP/1.1
Accept-Encoding: gzip,deflate
Accept-Language: en-us,en;q=0.5
Accept-Charset: ISO-8859-1,utf-8;q=0.7,*;q=0.7
Host: twitter.com
User-Agent: Mozilla/5.0 (X11; U; Linux i686; en-US; rv:1.9.1.7) Gecko/20100106 Ubuntu/9.10 (karmic) Firefox/3.5.7
Keep-Alive: 300
Accept: text/html,application/xhtml+xml,application/xml;q=0.9,*/*;q=0.8

----------------------------END OF HTTP REQUEST----------------------------
HTTP/1.0 200 OK
Content-Length: 5432
X-Transaction: 1265741234-96812-30412
Server: hi
The Burp Proxy is part of the Burp Suite, a toolkit for attacking web applications. It is a Java program which runs as HTTP proxy or transparent proxy. The Burp Proxy allows interception of HTTP requests, where the request can be altered before it is sent to the server.
- Start Burp Proxy, by running java -jar burpsuite_v1.3.jar.
- Configure the client to use the proxy. Host localhost, port 8888.
- Do the request.
- Burp Proxy shows the request. Click "forward" to send the request. Click "intercept is on" to turn intercepting off and forward each request immediately.
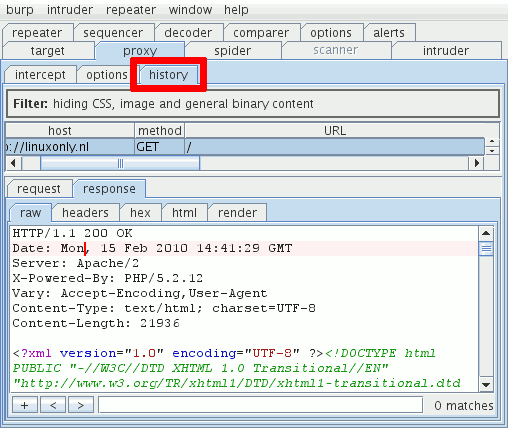
- The response is shown in the "history" tab.
- HTTP proxy
- Port forwarding
$ python tcpwatch.py -L 8000:linuxonly.nl:80Thus the request can be seen by using the URL http://localhost:8000/. However, as TCPWatch does not rewrite the Host header, this will not trigger the right virtual host.
Proxy mode
- Start TCPWatch, by running python tcpwatch.py -p 8080.
- Configure the client to use the proxy. Host localhost, port 8080.
- Do the request.
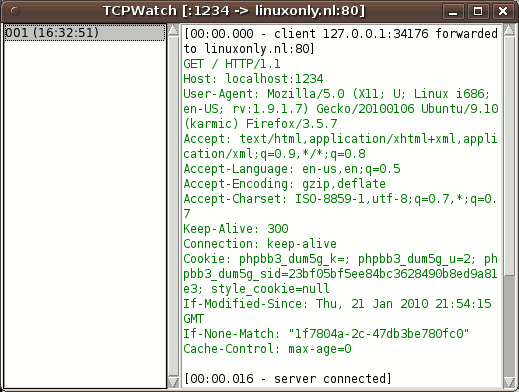
- In TCPWatch, click on the number in the left column.
- The request and response are shown in the right column.
Forwarding mode
- Start TCPWatch, by running python tcpwatch.py -L 8000:host.example.com:80, where host.example.com is the site to connect to and 8000 is the local port to listen on.
- Do the request, using the URL http://localhost:8000/.
- In TCPWatch, click on the number in the left column.
- The request and response are shown in the right column.